Monday, May 29, 2006

It's quiet. Too quiet. Time to change that.

What you need:

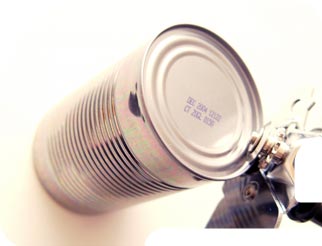
  • Lots of empty food cans. Look for the ones which have crimped lids at both ends. You'll need 4 or more cans per musical instrument.
  • A can opener. The kind that takes just the lid off, leaving the crimped rim.
  • Tape. Ordinary sticky tape will do, but best of all is electrician's insulation tape - you can stretch it a bit to make it really tight.

What to do:

NB Be very, very careful of sharp edges. Good can openers will leave a smooth edge, but even if you think you have one of those, take care when handling the can.

  1. Keep one can back - we'll come back to it in a moment.
  2. Wash the cans out, and remove both ends from them. If they go all floppy at this point, you have the wrong sort of can opener. Or the wrong sort of can. Or both.
  3. Join the cans end-to-end, and tape them very tightly, so you're making a single, rigid cylinder. A cylinder three cans long is enough, but four, five or six cans will work too. Go back to the can you held back, and add it to the end of your cylinder so you have a tube, closed at just one end. It may not look like much, but you've just made a musical instrument.
  4. Hold it lightly, and bash the closed end on the ground - you should hear the cylinder ring with a surprisingly pleasant note. I usually find it works best on carpet, and if you tilt the tube slightly so you're bashing the rim at an angle rather than the end, flat-on. If you make a number of cylinders of different lengths you'll find they play different notes - so you can drum away to your heart's content.

What's going on:

When you bash the tube, you start it ringing with a wide range of frequencies, but very quickly one note dominates - the natural frequency of the cylinder. The longer the cylinder, the lower the natural frequency - the lower the note.

My assumption is that the main wavelength produced is a little over twice the length of the tube, but without investigating with a spectrum analyser it's hard to know - let me know if you try. More mysterious is why the sound produced is so pleasant, when you'd expect a ghastly metallic clank. But then, musical instruments - even ones made out of old soup tins - are more an art than a science.

Incidentally, you need the double-rimmed cans because the other kind are too floppy when you take the base off. Many very cheap cans are stamped out of a single piece of aluminium with a lid added - they have rounded bases that are musically useless.

Find more practicals you can do at home on the practical of the week link below.

Drinking Straws and Pop!

This is one of those cool physical tricks that's difficult the first time, but extremely satisfying when you get it right, and extremely annoying for everyone else.

What you do:

You have to do all of the following quickly, as one sequence of events, so it's imperative that you and your accomplice have worked out how you're going to achieve it. Alternatively, you can be bumbling idiots so long as you have enough straws to practice with. Your choice.
  1. Hold the straw sideways in front of you, then fold over the ends - just a centimetre of them. Pinch the folds very tightly between your thumbs and forefingers.
  2. Now wind the straw up. The action is rather like twiddling your thumbs, only with a straw in the way. You'll find that the ends of the straw wind in towards the middle, which looks increasingly like it's bulging with all the air being squeezed into it. Uncanny, that, since it's bulging with all the air being squeezed into it.
  3. Your accomplice comes into play when you have about three centimetres of straw left, bulging away between the wound-up ends. Stop winding,and - quick, quick! - get your accomplice to flick that bit with their finger. They should flick hard, but should aim for the straw and not your knuckles. Especially after they've tried that gag the previous dozen times.
  4. If everything goes to plan, you should hear a sharp and very loud 'crack!'

What's going on:

Folding over the ends of the straw very nearly seals them, so when you wind the straw up you squeeze a straw's-worth of air into just that middle part. The pressure in there is very high - if you allow for a little air to leak out, it's still perhaps twice normal atmospheric pressure. You have to finish the trick quickly or the air will find its way out of the ends, which won't be perfectly sealed however tightly you're squeezing.

The flimsy straw can handle the pressure - but only barely, and only because a smooth cylinder is the best shape of pressure vessel there is. Flicking the straw distorts its cylindrical shape, increasing the stress at the sides. The result is that the plastic bursts, and you'll probably see a long slit up the side of the straw.

The loud noise you hear is the compressed air escaping rapidly through the slit.

If you're particularly dextrous and practice a bit, you might be able to flick the straw all on your own, without needing an accomplice at all. It's hard, though - click here to see a video of it being done (2MB .mov file - requires quicktime to play).

Sunday, May 28, 2006

Drinking Straws and Pop!

This is one of those cool physical tricks that's difficult the first time, but extremely satisfying when you get it right, and extremely annoying for everyone else.

What you do:

You have to do all of the following quickly, as one sequence of events, so it's imperative that you and your accomplice have worked out how you're going to achieve it. Alternatively, you can be bumbling idiots so long as you have enough straws to practice with. Your choice.
  1. Hold the straw sideways in front of you, then fold over the ends - just a centimetre of them. Pinch the folds very tightly between your thumbs and forefingers.
  2. Now wind the straw up. The action is rather like twiddling your thumbs, only with a straw in the way. You'll find that the ends of the straw wind in towards the middle, which looks increasingly like it's bulging with all the air being squeezed into it. Uncanny, that, since it's bulging with all the air being squeezed into it.
  3. Your accomplice comes into play when you have about three centimetres of straw left, bulging away between the wound-up ends. Stop winding,and - quick, quick! - get your accomplice to flick that bit with their finger. They should flick hard, but should aim for the straw and not your knuckles. Especially after they've tried that gag the previous dozen times.
  4. If everything goes to plan, you should hear a sharp and very loud 'crack!'

What's going on:

Folding over the ends of the straw very nearly seals them, so when you wind the straw up you squeeze a straw's-worth of air into just that middle part. The pressure in there is very high - if you allow for a little air to leak out, it's still perhaps twice normal atmospheric pressure. You have to finish the trick quickly or the air will find its way out of the ends, which won't be perfectly sealed however tightly you're squeezing.

The flimsy straw can handle the pressure - but only barely, and only because a smooth cylinder is the best shape of pressure vessel there is. Flicking the straw distorts its cylindrical shape, increasing the stress at the sides. The result is that the plastic bursts, and you'll probably see a long slit up the side of the straw.

The loud noise you hear is the compressed air escaping rapidly through the slit.

If you're particularly dextrous and practice a bit, you might be able to flick the straw all on your own, without needing an accomplice at all. It's hard, though - click here to see a video of it being done (2MB .mov file - requires quicktime to play).

Thursday, May 25, 2006

Science in Key Stage 3 (year 7,8 & 9)

Sometimes a google search just gives you too many places to look. Why not let the cyber monkey do all the hard work for you? He hangs around in cyberspace looking for the best science websites linked to the things you are learning in your science lessons. Take some time to have a look, especially useful if you don't fully understand something, want to do some research for your homework or learn something new. Look out for the odd banana thrown in - click them and see where they take you! Nearly forgot - click the monkey to go to find out more......

Saturday, May 20, 2006

It's quiet. Too quiet. Time to change that.

What you need:

  • Lots of empty food cans. Look for the ones which have crimped lids at both ends. You'll need 4 or more cans per musical instrument.
  • A can opener. The kind that takes just the lid off, leaving the crimped rim.
  • Tape. Ordinary sticky tape will do, but best of all is electrician's insulation tape - you can stretch it a bit to make it really tight.

What to do:

NB Be very, very careful of sharp edges. Good can openers will leave a smooth edge, but even if you think you have one of those, take care when handling the can.

  1. Keep one can back - we'll come back to it in a moment.
  2. Wash the cans out, and remove both ends from them. If they go all floppy at this point, you have the wrong sort of can opener. Or the wrong sort of can. Or both.
  3. Join the cans end-to-end, and tape them very tightly, so you're making a single, rigid cylinder. A cylinder three cans long is enough, but four, five or six cans will work too. Go back to the can you held back, and add it to the end of your cylinder so you have a tube, closed at just one end. It may not look like much, but you've just made a musical instrument.
  4. Hold it lightly, and bash the closed end on the ground - you should hear the cylinder ring with a surprisingly pleasant note. I usually find it works best on carpet, and if you tilt the tube slightly so you're bashing the rim at an angle rather than the end, flat-on. If you make a number of cylinders of different lengths you'll find they play different notes - so you can drum away to your heart's content.

What's going on:

When you bash the tube, you start it ringing with a wide range of frequencies, but very quickly one note dominates - the natural frequency of the cylinder. The longer the cylinder, the lower the natural frequency - the lower the note.

My assumption is that the main wavelength produced is a little over twice the length of the tube, but without investigating with a spectrum analyser it's hard to know - let me know if you try. More mysterious is why the sound produced is so pleasant, when you'd expect a ghastly metallic clank. But then, musical instruments - even ones made out of old soup tins - are more an art than a science.

Incidentally, you need the double-rimmed cans because the other kind are too floppy when you take the base off. Many very cheap cans are stamped out of a single piece of aluminium with a lid added - they have rounded bases that are musically useless.

Find more practicals you can do at home on the practical of the week link below.

Saturday, May 13, 2006

What's Dolphin for 'Flipper'?

Dolphins have the ability to call each other by name - just like humans! Scientists have found the mammals recognise themselves and other members of their species with special whistles. Up until now, humans were thought to be the only species that actually use names for one another.
Scientists say it's not unusual for animals to use sounds recognised by whole species, but it is extremely rare for species to use individual 'names' to communicate.

During the study experts caught a group of wild dolphins and recorded their calls. Scientists used a computer to copy the calls and then played them back to the dolphins. Most of the dolphins responded to the whistles of their relatives, suggesting they can recognise each other's signature whistle.

And if you thought this was uncannily human - what about pig makeovers?

Wilma, a Vietnamese pot-bellied pig, was rejected by two potential boyfriends so her keepers at Twin Lakes Park decided to give her a hand. The lonely sow has been given a bath and a trotter manicure to make her feel good. Wilma also had a special pig massage and her sty has been tidied. It's hoped the treats will do the trick and encourage Wilma to start a family.

Keeper Sue Statham said she hoped the makeover would boost Wilma's confidence: "We think Wilma is a very beautiful pot-bellied pig but she has been most unsuccessful in love. We are really hoping that by making her feel good about herself, she'll entice the boys into her sty."

Whatever next? Hamster spas? Hot tubs for depressed Koi carp?

More on this link.......

A very cool evolutionary game

click here to startrEvolution is the online biology experience from Cambridge University. To get started, click on the image left! (Flash version 8.0 required)

The Rattleback

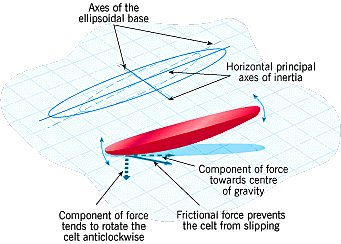
The rattleback, or celt, is one of those science toys that seems so simple, yet behaves in a highly counterintuitive way. It has fascinated people of all ages-- and challenged even accomplished scientists.

Smooth stones with the odd behavior displayed by the celt have been discovered by peoples around the globe. Basically, when spun one way about its vertical axis, the celt will spin for a long time. When spun the other way, however, an ever amplifying wobble sets in ultimately bringing the spin to a halt and then -- almost miraculously - reversing it! In his key paper of 1986 Sir Hermann Bondi wrote: "Many people, even trained scientists, find it hard to understand that the behaviour of the toy doesn't violate the principle of conservation of angular momentum." That's the attraction - this simple device, this toy, displays behavior that deviates from what we have learned to expect from similar devices spun over a lifetime of empirical observation.

Make your own in the Practical of the week.
Watch a video of one (QuickTime 2.8 MB).
Learn the physics of the rattle back on this link.

Rattleback

Take an ancient Celtic axe, place it on a flat surface, spin it, and you'll find two surprises. Firstly, it doesn't behave as you'd expect. Secondly, you have an ancient Celtic axe? Really

No, I thought not. This week, we'll use household junk to make a rattleback, something with the same weird dynamic properties as a Celtic axe. It's a bit less good at chopping your leg off, but in most circumstances that's a plus.

What you need:

A plastic spoon. Preferably a large one, like a dessert spoon. Not a desert spoon, that's something quite different.
Some plasticene, modelling clay, blutack, or similar. Play-dough is too light, sorry.
A plastic ruler. 30cm is fine, but 20cm is better if you can find one.

What you do:

Snap the bowl off the spoon (be careful to aim it away from yourself when you do this, in case it fires splinters), and fill it with a big blob of plasticene. You want it to look like a heaped spoonful of plasticene.
Now imagine you hadn't snapped the handle off, and line the spoon up with the ruler. Slide one over the other until the bowl of the spoon is dead-centre of the ruler. In a moment, you're going to push the two together so the plasticene sticks them, but just before you do, twist the bowl of the spoon. Just turn it, ever so slightly - five or ten degrees is plenty. Now squidge them together
You'll have to juggle everything around a bit so that when you put your rattleback on a table, spoon-side down, it balances nicely. You want the ruler to rest parallel to the table, without one end touching or one side being especially lower than the other. Smudge the spoon around until you've got that. Done? Good
Now, spin your rattleback. Give it a good flick with your fingers so it spins several times, and see what happens. When it stops, try spinning it in the other direction.

What's going on

What you should see is that your rattleback is quite happy spinning in one direction (either clockwise or anticlockwise), but if you spin it the other way, it objects. It'll start to rock, and then rattle, and then - amazingly - it'll stop spinning, and simply rock back and forth like a see-saw. If you're lucky, it'll even start to rotate the other way.

It's around about now that you'll want an explanation. Which is, unfortunately, extremely hard. The hand-waving argument is that the asymmetry of the rattleback is crucial. Remember you skewed the spoon? If you unskew it and spin the thing again, you'll find that it'll go either way quite happily.

If you think about the rattleback rocking back and forth, and the way the skewed spoon twists the ruler, it's fairly easy to see how it might start spinning from the rocking motion. Everything else is about the rattleback transferring energy from one sort of motion (rotation) to another (oscillation - rocking) and back again (rotation in its 'preferred' direction).

The full explanation was only worked out in 1986, by a physics professor from Cambridge. But if you want to look it up, you'll find more about these curious toys on this link.

Friday, May 5, 2006

The Meaning of Life on your iPod

You may be quite happy listening to the Gorillaz on your iPod but how about chimpanzees? Professor Steve Jones of University College London tackles the thorny issue of 'why creationism is wrong and evolution is right' in a podcast downloadable from the Royal Society's web site. During a lecture that is in turn engaging, humorous, and stimulating, Steve explains how evolution can be seen at work today in the AIDS epidemic and even the manufacturing of washing powder. It is very entertaining and thought provoking.

Are humans 50% banana? Is it safe to kiss a chimpanzee? Do languages evolve in the same way as humans? These questions and more are answered here.

Wednesday, May 3, 2006

Do frozen frogs sink?


Ice. Commonly found in your lemonade, not found as much as we'd hope near the Earth's poles, and found altogether too much on the inside of the hull of the Titanic. Of several surprising properties, perhaps the most obvious is that it floats.

What you need:

An ice-cube tray.
A good cold freezer.
Two glasses.
A bottle of olive oil.
No frog.

What you do:

We'll come to the frog in a moment.
Fill some of the ice-cube tray with water, some with olive oil, and stick it in the freezer. Surprisingly, along with the water freezing into ice, the olive oil will solidify too.
While that's going on pour a glass of water and another glass of olive oil. Remember which is which - you wouldn't want to drink the wrong one!
Finally, drop an ice cube in the glass of water, and an oil cube in the glass of olive oil. What happens? The ice cube should float whereas the olive oil cube sinks.

What's going on?

Ice floats on water. The oil cube does exactly what all other solids do - it sinks. That's because as its temperature fell, the oil became more and more dense, gradually hardening into a solid. The solid oil is denser than the liquid, so it sinks.

But ice does something very different. Water is a small but subtle molecule. When it cools, it starts to crystallise. The hydrogen and oxygen parts of neighbouring molecules arrange themselves to point at each other. That rigid structure causes ice to have a greater volume than water - it's less dense. That's why ice floats in its own liquid – but most other solids don't.

This also presents problems if you're an organism that sometimes freezes. The ice crystals take up more room than the water did, and if they grow too large they can burst your cells. Lettuce has this problem, which is why you don't see frozen lettuce - when it thaws; it's floppy and disgusting.

But frogs face the same challenge, too. Some species can survive as much as 60% of their body water freezing solid. They cope by using chemicals like glucose not just as antifreeze - to lower the freezing point – but also to prevent the growth of large ice crystals once they do freeze.

See here for more details, but don't go freezing frogs. It's plain rude.